How to Choose Mannequins for Online Clothing Photography

Time:2026-10-02 Author:Aria
0%

Choosing the right mannequin can change how customers understand an online clothing photograph. A jacket may look structured on one form, yet appear flat on another. Sleeve position, shoulder width, skin tone, surface finish, and body proportions all influence the garment’s visual message. This is why learning How to choose mannequins for online clothing photography requires more than selecting the cheapest display model.

David Geller, a long-time mannequin industry specialist, has offered a useful principle: “The mannequin should support the garment, not compete with it.” That idea matters in practical studio work. A glossy black mannequin can create distracting reflections near dark fabric. A realistic face may pull attention away from a collar or neckline. For clean catalog images, a matte, neutral, full-body form often produces more consistent results. Ghost mannequins can show shape without visible support, but they may hide construction details around the waist or shoulders.

This guide will examine mannequin types, proportions, finishes, poses, and camera compatibility. It will also consider product categories. Knitwear needs different support from tailored jackets. Children’s clothing needs accurate scale. Accessories may require detachable hands or flexible arms.

Small choices matter.

There is no perfect mannequin for every store. Budget limits, studio space, and brand identity can complicate the decision. Even experienced sellers sometimes choose a form that looks impressive but photographs poorly. Testing one sample garment before buying several mannequins remains a sensible step. The strongest setup is not always the most realistic one. It is the one that presents fabric, fit, and detail honestly.
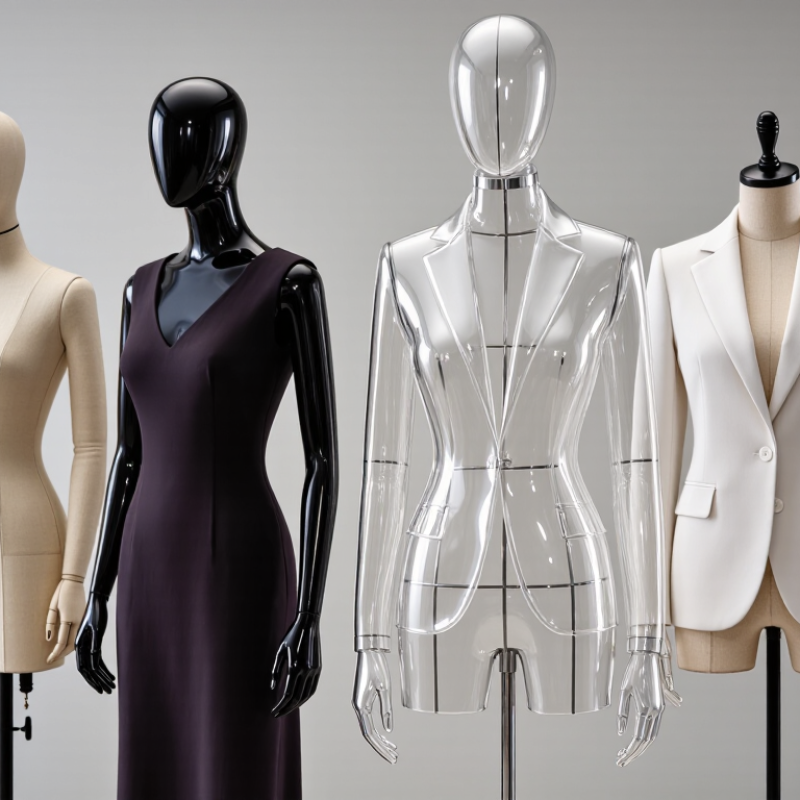
How to Choose Mannequins for Online Clothing Photography

Define the Purpose and Style of Your Clothing Photography

Choosing a mannequin starts with the purpose of your clothing photography, not its appearance. An online store usually needs clear, repeatable images that show fit, shape, and fabric details. A torso mannequin can create a clean ghost-mannequin effect for shirts, jackets, and knitwear. Full-body forms work better when customers need to see trouser length or garment proportions.

Define the visual style before buying equipment. A matte, neutral surface keeps attention on the clothing and reduces distracting reflections. Editorial photography may require a posed mannequin with stronger shoulders or a visible head. Lifestyle images can use relaxed forms that suggest movement without overpowering the garment. Shape matters. Measure twice. Compare the mannequin’s chest, waist, hip, and shoulder measurements with your size chart. Small differences can distort seams and make clothing appear poorly fitted.

In my studio experience, consistency matters more than dramatic posing. Keep the same camera height, lighting direction, and mannequin position across a product collection. Photograph a test garment first. Check collars, sleeves, hems, and shadows at full image size. I once selected a narrow mannequin because it looked elegant, but the shoulders pulled unnaturally. The final images seemed polished, yet they misrepresented the fit. That mistake taught me to judge the mannequin through the camera, not only by eye. Recheck the setup when fabrics change, especially with satin, heavy wool, or transparent layers. Keep it quiet.

Select the Mannequin Type for Your Garment and Brand

Choosing the right mannequin starts with the garment, not the camera. A fitted blazer needs firm shoulders and a defined chest. A loose linen shirt needs a softer form with natural drape. For trousers, select a lower-body mannequin with clear hips and a stable waistline. Otherwise, fabric may bunch around the zipper or pockets.

Your brand’s visual character matters too. A faceless torso suits clean, product-focused photography. A realistic head and hands can support lifestyle clothing with more emotional detail. Use matte surfaces to reduce glare under studio lights. Neutral gray, cream, or soft white usually keeps attention on the garment. Match the mannequin’s proportions across every product image. Customers notice inconsistent sizing, even when they cannot explain why.

I learned this after photographing a structured dress on a flexible display form. The waist collapsed slightly, and the seams looked uneven. The images were usable, but not trustworthy enough for a size-conscious shopper. Measure the mannequin’s bust, waist, hips, and shoulder width before purchasing. Check those measurements against your sample garment, not only the supplier’s chart. Test one outfit under your actual lighting setup. A mannequin that looks elegant in person may cast distracting shadows online. Small mistakes remain visible.

Match Mannequin Size, Shape, and Pose to the Target Audience

Choose a mannequin that resembles the customer, not merely the garment. The NRF 2024 Consumer Returns Report estimated $890 billion in returned merchandise. Fit uncertainty remains a costly problem. Match bust, waist, hip, shoulder width, and height to your core buyer. A petite audience needs a shorter torso and realistic proportions. Tall shoppers need longer visual lines.

Pose matters as much as size. A relaxed, slightly turned pose shows drape around the waist and hips. A straight pose reveals symmetry and construction. Avoid dramatic angles. They can hide tight seams. For fitted clothing, use a mannequin close to the target body shape. For loose garments, choose enough volume to show movement without stretching the fabric.

Use regional size charts and your own sales data. Do not trust a single “medium.” Online shoppers often interpret the same label differently. The Baymard Institute’s product-page research consistently emphasizes clear imagery and product details during purchase decisions. Photograph front, side, and back views at the same camera height. Include close shots of armholes, waistbands, and hems. Test two mannequin shapes with real customers if possible. My first choice may still be wrong. Clothing behaves differently under studio lights. Record return reasons, adjust the mannequin, and reshoot weak products.

How to Choose Mannequins for Online Clothing Photography — Match Mannequin Size, Shape, and Pose to the Target Audience

Target Audience Recommended Mannequin Size Useful Body Measurements Body Shape Recommended Pose Best-Suited Clothing Photography Benefit Selection Notes
Women’s mainstream ready-to-wear US 6–8EU 38–40 Bust: approximately 86–92 cm
Waist: approximately 68–74 cm
Hip: approximately 94–100 cm
Balanced hourglass or lightly defined waist Neutral, front-facing pose with relaxed arms Dresses, blouses, skirts, trousers, knitwear Creates a familiar reference point for a broad adult customer base and keeps garment proportions easy to compare. Use a consistent size across the catalog. Always publish the garment’s actual measurements because size labels differ by market and cut.
Women’s petite collection Short-torso formApprox. 155–163 cm height Use a shorter torso and proportionally shorter inseam than a standard adult form; keep bust, waist, and hip measurements aligned with the selected size. Compact frame with balanced shoulders and hips Straight standing pose with minimal torso rotation Petite dresses, cropped jackets, ankle-length trousers Shows whether hems, waistlines, pockets, and sleeve lengths sit correctly on a shorter frame. Do not simply scale down a standard mannequin; petite customers often need different vertical proportions, not only smaller circumference measurements.
Women’s plus-size or curve collection US 18–24EU 48–54 Use the brand’s intended size chart; common fit checks include fuller bust, waist, hip, upper arm, and thigh measurements. Fuller bust and hip with a realistic waist-to-hip relationship Stable upright pose with one foot slightly forward Curve dresses, tailored jackets, denim, knitwear, occasionwear Displays stretch, drape, bust shaping, arm mobility, and garment coverage more accurately than a narrow form. Choose a form with sufficient bust, hip, and upper-arm volume. Avoid exaggerated curves that distort fit expectations.
Men’s mainstream clothing Chest 96–104 cmUS/UK M–L Chest: approximately 96–104 cm
Waist: approximately 81–89 cm
Shoulder width: approximately 44–47 cm
Moderate shoulder width with a relatively straight torso Front-facing or slight three-quarter pose with arms relaxed Shirts, overshirts, knitwear, trousers, casual jackets Makes shoulder seams, collar placement, button spacing, and torso ease easy to evaluate. Match the mannequin’s shoulder width and chest depth to the target size; these often affect fit more visibly than height alone.
Men’s tailored clothing Chest 96–104 cmRegular torso Prioritize chest, shoulder, back width, waist suppression, and sleeve length over general body height. Structured shoulders with a clean, moderately tapered torso Still three-quarter pose, arms slightly away from the body Suits, blazers, formal coats, dress shirts, waistcoats Reveals lapel roll, shoulder balance, jacket closure, back vents, and sleeve break. Use a rigid, well-supported form. Soft or slouching forms can hide tailoring problems and change the jacket’s silhouette.
Teenagers and young adults Youth or junior formSize-specific Use age-appropriate height and proportions; measure chest, waist, hip, shoulder, and inseam rather than relying only on age. Less mature, straighter proportions with a natural shoulder line Relaxed standing pose or subtle walking pose Hoodies, T-shirts, denim, uniforms, casual dresses, streetwear Supports a casual visual language while showing ease, length, and layering clearly. Avoid adult-shaped forms for youth garments. Children and teens change rapidly in height and proportion, so the size reference should be explicit.
Children’s clothing Age/height-specificApprox. 92–152 cm height Use height, chest, waist, hip, shoulder, and inseam measurements. Age labels are not reliable substitutes for body measurements. Age-appropriate child proportions with a shorter torso and larger head-to-body ratio Simple upright pose with safe, stable support Schoolwear, playwear, outerwear, coordinated sets Shows sleeve and trouser length, neckline position, ease for movement, and overall scale. Use secure bases and avoid unstable articulated poses. Do not imply a precise fit from age alone; include a height-based size chart.
Modest fashion customers Size matched to collectionFull-coverage form Prioritize shoulder, bust, upper arm, wrist, hip, and garment-length compatibility with the intended size. Natural, non-exaggerated silhouette with a smooth torso Front-facing pose with arms close to the body Long dresses, abayas, tunics, wide-leg trousers, layering pieces Preserves the intended coverage and makes length, volume, and layering easier to judge. Choose a form without prominent anatomical detailing. Keep styling and poses respectful and consistent with the product’s use context.
Activewear and performance clothing Athletic fit formSize matched to product Prioritize chest or bust, waist, hip, thigh, shoulder, and inseam measurements; compare these with the garment’s stretch and compression specifications. Firm, balanced athletic frame without extreme muscle definition Dynamic walking, lunge, or bent-arm pose, supported securely Leggings, sports bras, cycling shorts, tracksuits, training tops Demonstrates stretch direction, mobility, waistband position, gusset placement, and coverage during movement. Use dynamic poses only when the form is stable. Photograph a neutral pose as well so customers can assess the garment’s baseline fit.
Outerwear and layered clothing Mid-range core sizeRoom for layering Check shoulder width, chest or bust depth, upper arm circumference, and back width to accommodate intended base layers. Balanced frame with enough depth for a realistic layered silhouette Three-quarter pose with one arm slightly bent Coats, parkas, puffer jackets, trench coats, overshirts Displays collar, hood, front closure, sleeve mobility, side volume, and back length. Do not choose a very narrow form for oversized outerwear; it can make insulation, ease, and layering capacity appear larger than they are.
Accessories and neckline-focused products Standard torsoNeck and shoulder clarity Neck circumference, shoulder width, chest or bust, and upper-back shape are the most relevant measurements. Clean neck, shoulder, and upper-chest contours Front-facing bust or torso pose; use close-up framing when appropriate Scarves, necklaces, collars, ties, camisoles, tops Improves visibility of scale, drape, neckline placement, and how an accessory sits against the body. Keep the form’s surface matte and neutral so color, texture, and shine from the product remain the visual focus.

Measurement ranges are practical photography references rather than universal size standards. Regional sizing systems and garment ease vary, so product-specific body and garment measurements should always accompany the images.

Evaluate Materials, Features, and Photo-Friendly Design

Choosing a mannequin for online clothing photography starts with the surface, not the pose. Matte fiberglass reduces glare under softboxes. High-density foam feels safer for pins and delicate fabrics. However, foam can show dents after repeated styling. I learned this after a sleeve kept collapsing during a shoot. Small defects become obvious on large screens.

Photo-friendly design matters because shoppers inspect details closely. Baymard Institute reports that 56% of users first explore product images on ecommerce pages. Choose a mannequin with natural shoulders, a stable base, and adjustable arms. Removable hands make shirts easier to dress. A detachable neck helps when photographing collars and scarves. Neutral gray or warm white usually protects color accuracy better than glossy black. Keep the pose relaxed. Extreme angles can distort the garment’s fit.

Returns add practical pressure. The 2023 Consumer Returns in Retail report from NRF and Appriss Retail estimated that 17.6% of online sales were returned in the United States. Accurate images cannot solve every sizing problem, but they can reveal drape, seams, and sleeve length. Photograph the front, back, side, and close details using the same mannequin height. Check the hem twice. My own setup still misses some fabric movement, especially with lightweight knits. That limitation deserves honest review before choosing a rigid form.

Test the Mannequin for Fit, Lighting, and Consistent Results

Choosing a mannequin for online clothing photography starts with a practical fit test. Place a sample garment on the form and check shoulder seams, waist tension, sleeve length, and hem position. A mannequin that is too narrow can make structured clothing look loose. One that is too large may create false wrinkles.

Test the mannequin under your actual lighting setup. Use soft light from the front, then add side lighting to reveal folds and texture. Watch for shiny areas on the chest, shoulders, and face. These highlights can distract shoppers from the garment. Matte surfaces usually produce cleaner images, but they may still need slight repositioning. Small changes matter.

Consistency is equally important. Mark the mannequin’s foot position on the floor and record its height, camera distance, and rotation angle. Photograph the same item from several angles before approving the setup. Check whether the neck, arms, or torso hide important design details. I have found that adjustable forms improve flexibility, yet they can shift between sessions. That weakness is easy to overlook. Recheck the joints before every shoot.

Use one test garment with familiar measurements. Compare the photographed shape with the garment laid flat and measured by hand. If the images repeatedly exaggerate the fit, change the form rather than editing the evidence. Accurate presentation builds trust, even when the result looks less dramatic.

FAQS

How should I choose a mannequin for online clothing photography?

Choose it according to the garment and image purpose. Torso forms suit shirts, jackets, and knitwear. Full-body forms show trouser length and proportions.

What surface works best for clothing photography?

A matte, neutral surface reduces glare and keeps attention on the garment. Glossy black surfaces may create distracting reflections. Quiet colors help protect color accuracy.

How can I prevent inaccurate garment fit?

Compare the mannequin’s chest, waist, hip, and shoulder measurements with your size chart. Small differences can pull seams or distort sleeves. Measure twice.

Should the mannequin have a visible head?

It depends on the visual style. Editorial images may use a visible head and stronger shoulders. Clean product images often benefit from a simple torso form.

Which mannequin features make dressing easier?

Look for natural shoulders, a stable base, and adjustable arms. Removable hands help with shirts. A detachable neck simplifies collars and scarves.

Is foam or fiberglass better for repeated styling?

Matte fiberglass usually handles softbox lighting well. High-density foam feels safer for pins and delicate fabrics. Foam can develop dents over time.

How can I keep a clothing collection visually consistent?

Keep the camera height, lighting direction, mannequin position, and height consistent. Photograph front, back, side, and close details. Check hems twice.

Can one mannequin show every fabric accurately?

Not perfectly. Satin may reflect strongly, while heavy wool changes the silhouette. Lightweight knits may lose natural movement on a rigid form.

What mistake should photographers watch for?

Do not judge the mannequin only by eye. Test one garment through the camera. I once chose a narrow form, and its shoulders pulled unnaturally.

How can better mannequin images reduce returns?

Clear images can reveal drape, seams, sleeve length, and garment proportions. They cannot solve every sizing issue. Review the setup honestly.

Conclusion

How to choose mannequins for online clothing photography begins with defining the purpose, visual style, and target audience of your images. Decide whether your clothing needs a realistic, editorial, minimalist, or invisible presentation, then select a mannequin type that supports the garment and reflects your overall brand identity. Consider the mannequin’s size, body shape, proportions, and pose so the clothing appears natural and appealing to your intended customers.

Material and construction are also important. Choose a mannequin with a clean, photo-friendly surface, durable structure, and useful features such as adjustable parts or removable sections when needed. Before making a final decision, test how the mannequin fits different garments, responds to studio lighting, and performs across repeated shoots. A well-chosen mannequin helps clothing maintain its shape, improves visual consistency, and creates professional product photos that allow shoppers to understand the fit, style, and details of each item.

Aria

Aria

Aria is a dedicated marketing professional with a deep passion for innovative strategies and a keen understanding of our company's product offerings. With a wealth of experience in the industry, Aria excels at crafting engaging content that highlights the unique features and benefits of our......