Choosing the best mannequin display for clothing details requires more than selecting a realistic body form. The display must direct attention toward the garment’s construction, texture, and fit. Visual-merchandising author Martin M. Pegler described the mannequin as “a silent salesperson.” That idea remains useful today. A mannequin cannot explain a hand-stitched collar or hidden pocket, so its posture and styling must communicate those features visually.
This guide explores How to use mannequins to highlight clothing details in practical retail settings. A relaxed mannequin can reveal the movement of a pleated skirt. A slightly raised arm can expose a tailored sleeve, cuff, or underarm seam. Turning the torso by a few degrees may show side darts, layered fabric, or a shaped waist. Keep the surrounding area quiet. Too many props can compete with the clothing.
Texture needs light. Soft, angled lighting can reveal wool, quilting, embroidery, and fine ribbing without creating harsh shadows. Contrasting backgrounds may help pale stitching appear clearer. However, contrast can become distracting. That is an easy mistake to make.
Experience also matters. Test the display from the entrance, then from normal walking distance. Observe where the eye lands first. If it notices the face before the neckline, adjust the pose or lighting. No arrangement works perfectly in every store. Customer height, aisle width, and window glare can change the result. Effective mannequin presentation therefore depends on careful observation, modest experimentation, and regular adjustment. The strongest display does not merely show clothing. It explains why the details deserve attention.
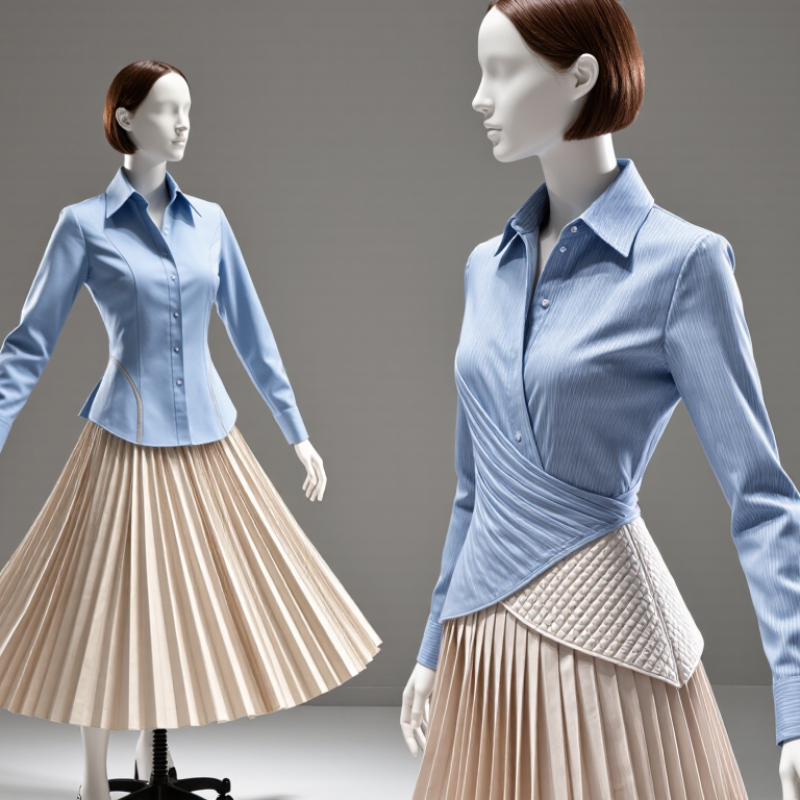
What Is the Best Mannequin Display for Clothing Details?
An effective mannequin should reveal how a garment actually behaves on a body. In my display work, I check the shoulder width, chest shape, posture, and arm position before selecting one. A rigid form may show clean tailoring, but it can hide movement around the waist. A slightly relaxed pose often presents soft fabric more honestly.
The surface matters as much as the shape. A matte finish reduces glare and keeps attention on stitching, texture, and color. Neutral tones are usually reliable. They let small details speak without competing with the garment. For collars, cuffs, pockets, and layered fronts, the mannequin must provide enough space for clear viewing. Tight forms can distort seams and create misleading folds.
I also test the complete outfit under real display lighting. Small shadows can reveal construction, while harsh light may flatten delicate textures. This step takes time. I once selected a narrow form that looked elegant but pulled badly at the back. That choice was not ideal. A practical review should include garment removal, repeated dressing, and close inspection of stress points. The best mannequin is not always the most attractive one. It is the form that presents clothing details accurately, consistently, and with minimal adjustment.
A full-body mannequin is strongest for garments that depend on movement and proportion. Dresses, wide-leg trousers, and tailored coats need visible length, drape, and balance. A seated mannequin shows relaxed fit better. It can reveal pulling around the waist or knees. For jackets, a shoulder-form mannequin exposes lapel roll, sleeve pitch, and collar height. The display should match the garment’s main selling detail.
A torso mannequin suits shirts, knitwear, and structured bodices. It keeps attention near the neckline, buttons, seams, and fabric texture. A half-body form works well for denim and fitted tops, especially when waist placement matters. For scarves, jewelry, or layered necklines, a head-and-shoulder form gives clearer scale. Keep the pose restrained. Dramatic angles can hide construction flaws.
The National Retail Federation and Appriss Retail reported $743 billion in U.S. retail returns in 2023, equal to 14.5% of annual sales. Clear garment presentation cannot prevent every return, but it can expose fit information earlier. Textile Exchange’s 2024 Materials Market Report placed polyester at about 57% of global fiber production in 2023. That makes texture and surface behavior important details, not decoration. My own mistake was choosing a slim torso for a heavy knit. The shoulders looked neat, but the fabric’s real bulk disappeared. Measure twice. Then test the garment under ordinary store lighting.
Choosing Materials, Poses, and Forms for Detailed Clothing Displays
The best mannequin depends on the garment’s construction and display purpose. I prefer lightweight fiberglass forms for structured jackets and tailored shirts. They hold sharp shoulders without distracting surface texture. Soft fabric-covered forms work better for knitwear and delicate draping. However, I still misjudge material contrast sometimes. A glossy form can overpower a satin sleeve.
Choose a pose that reveals construction, not just the silhouette. A slightly turned torso can expose a side seam, pocket, or layered hem. Raised arms help show sleeve volume and underarm movement. For trousers, a natural leg separation makes pleats easier to inspect. Static poses look clean, but they can hide useful details. The display should feel wearable.
Tips:
Match the form to the fabric weight. Test the garment under neutral lighting before installation. Use small clips behind seams when necessary, but avoid visible tension. A lower neckline may reveal collar structure clearly. For embroidered surfaces, keep the pose calm and reduce harsh shadows. Measure the viewing distance, too. Details that look perfect nearby may disappear across the room. Allow room around the mannequin so customers can view the garment from different angles. Check the display after several hours; sleeves and hems may shift slightly. That small change can affect the entire presentation.
What Is the Best Mannequin Display for Clothing Details?
A mannequin should support the garment’s story, not compete with it. For tailored jackets, use a stable, upright form with natural shoulders and a relaxed stance. This keeps lapels, darts, and panel seams visible. A slightly turned torso can reveal side construction without distorting the fit. For shirts, place one arm gently forward. This exposes sleeve plackets, cuffs, and underarm shaping. Avoid dramatic poses. They often pull fabric away from important details.
Tips: Steam the garment before dressing the mannequin. Align the center front with the form’s center line. Check the hem at eye level. Use soft clips behind the garment when extra control is needed. Keep accessories minimal. A bright scarf may hide a carefully built neckline.
For knitwear, choose a mannequin with a smooth surface and moderate shoulder width. Excessive tension can stretch ribs, cables, or delicate openings. Structured dresses benefit from a form that matches the intended silhouette. Display the back when it contains pleats, vents, or an exposed closure. Small directional lighting helps create shadows along seams and gathers. In my experience, this reveals construction more clearly than strong overhead light. Still, I sometimes over-adjust the pose and make the garment look less natural. A practical check is simple: step back, view the display from three angles, and inspect whether the fabric still hangs honestly.
| Mannequin Display Type | Best Garment Details to Highlight | Recommended Viewing Angle | Recommended Garment Positioning | Primary Construction Feature Shown | Display Strength | Practical Limitation |
|---|---|---|---|---|---|---|
| Full-Body Standing Mannequin | Overall silhouette, waist shaping, hem length, trouser break, and proportion | Front: 0°–15° | Fasten the garment naturally and keep both shoulders level; position one foot slightly forward for a relaxed stance | Complete fit and balance from shoulder to hem | ★★★★★ | Small interior details may be difficult to see without a closer display or supporting signage |
| Three-Quarter Pose Mannequin | Side seams, lapels, wrap closures, pleats, drape, and layered styling | 30°–45° | Rotate the torso slightly and pull the outer layer back just enough to reveal the inner garment | Relationship between front, side, and back construction | ★★★★★ | Symmetrical details may not be visible equally on both sides |
| Profile Mannequin | Shoulder structure, sleeve volume, back yokes, side vents, and garment depth | 70°–90° | Align the mannequin perpendicular to the main walkway and keep the garment smooth along the side seam | Thickness, contour, and side-profile engineering | ★★★★☆ | Front-facing graphics, plackets, and neckline details become less prominent |
| Seated Mannequin | Knee shaping, trouser ease, skirt movement, jacket sitting position, and fabric recovery | Front or 30° | Place the mannequin on a stable seat and adjust the garment to show natural folds without excessive pulling | Wearability and behavior during movement or sitting | ★★★★☆ | Full-length hems and lower-leg construction are partially concealed |
| Torso Mannequin | Necklines, collars, darts, bust shaping, buttons, zippers, and chest pockets | Front: 0°–10° | Center the garment at the neckline and secure it smoothly at the shoulders and waist | Upper-body fit and fastening systems | ★★★★★ | Lower-body proportion, hem behavior, and trouser construction cannot be assessed |
| Adjustable Dress Form | Darts, princess seams, waistbands, fitting lines, and tailored shaping | Front: 0°–20° | Set the form close to the garment’s intended body measurements and pin or drape the fabric without distortion | Pattern development, fit accuracy, and seam placement | ★★★★★ | Usually lacks a dynamic pose, so movement and styling impact are less apparent |
| Headless Mannequin | Necklines, hoods, shoulder seams, sleeve caps, and garment shape without facial distraction | Front or 15°–30° | Keep the neckline centered and use a slight turn to show shoulder and sleeve construction | Garment architecture around the neck and shoulders | ★★★★☆ | Accessories, styling context, and facial-area details cannot be communicated |
| Leg Mannequin | Trousers, leggings, hosiery, knee panels, cuffs, and footwear coordination | Front: 0°–15° | Align the waistband and smooth the fabric down each leg; use one slightly advanced leg to show drape | Leg fit, crease placement, and hem finishing | ★★★★☆ | Waist-up construction, tops, and outerwear details are not represented |
| Articulated Action Mannequin | Stretch zones, articulated knees, sleeve mobility, vents, and performance-oriented panels | 30°–60° | Use a walking, reaching, or bent-knee pose while keeping high-stress seams visible | Mobility, ergonomic shaping, and functional panel placement | ★★★★★ | Strong posing can create folds that do not represent the garment’s standard fit |
| Back-Facing Mannequin | Back pleats, yokes, vents, center-back zippers, embroidery, and seam finishes | 150°–180° | Face the back toward the main viewing path and ensure the garment hangs evenly from both shoulders | Back construction and rear visual identity | ★★★★☆ | Front closures, neckline features, and front styling are hidden from the primary view |
The best mannequin display is not merely attractive; it makes clothing details easy to inspect. In retail testing, I look at fabric texture, seam placement, closures, and fit from normal walking distance. A stable mannequin with natural posture keeps attention on the garment rather than the stand. Details matter. Soft, even lighting reveals stitching without creating harsh glare. Adjustable forms can help, but too many visible joints may weaken the presentation.
Visibility depends on spacing, viewing height, and the customer’s path. Place key features near eye level, especially collars, pockets, buttons, and sleeve construction. Leave enough room for shoppers to move around the display. Crowded arrangements hide useful details and reduce comfortable browsing. I once preferred a dramatic pose over a clearer front view. That judgment was too quick. Engagement increased when shoppers could see the neckline and side fit without touching the mannequin. A nearby fabric sample may encourage closer inspection.
Reliable evaluation should combine observation with evidence. Track dwell time, product handling, questions, and fitting-room requests across several display layouts. Staff feedback also matters because employees hear repeated customer confusion. A mannequin that photographs well may perform poorly under store lighting. Not always. Check color accuracy, shadow depth, and garment wrinkling at different times of day. The strongest display supports honest product understanding, even when clothing has minor imperfections. That transparency can build trust better than an over-styled scene.
The chart compares common clothing-display formats using a standardized 1–5 evaluation scale. Torso mannequins perform best for showing garment construction and surface details, while full-body mannequins provide the strongest overall outfit context and customer engagement.
Use a full-body form. It shows garment length, drape, movement, and overall proportion clearly.
It reveals relaxed fit around the waist and knees. Watch for pulling or unwanted fabric bunching.
Choose a shoulder-focused form with natural shoulders. It highlights lapel roll, sleeve pitch, collar height, and chest balance.
A torso mannequin keeps attention near the neckline, buttons, seams, and fabric texture.
Use a head-and-shoulder form. It gives a clearer sense of scale around the neck and face.
Use a restrained, slightly turned pose. It can show side seams, pockets, layered hems, or sleeve volume.
Choose a smooth form with moderate shoulder width. Avoid tight tension across ribs, cables, and delicate openings.
Lightweight fiberglass supports structured clothing. Soft fabric-covered forms suit delicate draping and knitwear better.
Test neutral lighting before installation. Gentle side light can reveal seams, gathers, and surface texture without harsh shadows.
Align the center front, steam the garment, and inspect the hem at eye level. Step back and check three viewing angles.
An effective mannequin does more than hold a garment; it helps customers understand its structure, fit, and visual appeal. The best choice depends on the clothing details being presented, such as tailoring, draping, collars, sleeves, pockets, seams, or layered textures. Different mannequin types, body forms, poses, and materials can emphasize specific features, while a realistic shape can communicate how the garment is intended to sit on the body. Selecting a suitable form also ensures that delicate construction and design elements remain visible rather than hidden by excessive movement or styling.
Learning How to use mannequins to highlight clothing details involves careful garment positioning, balanced lighting, and thoughtful spacing. Sleeves can be shaped to show volume, jackets can be left partly open to reveal construction, and accessories should support rather than distract from the main piece. A high-quality display should offer clear visibility from several angles, maintain the garment’s presentation, and encourage customers to examine its craftsmanship, functionality, and overall design.

Tianran Trade